- Ecommerce Marketing
- Integration
- Partners
- Product
Supercharge Customer Engagement with Okendo & Klaviyo
Guest Author | Apr 21, 2025
May 16, 2023 | 44 minute read
Lindsay Kolinsky
Director of Marketing
As Okendo continues to scale worldwide, there’s nothing that instills more pride in us than witnessing the success of our agency partners. We strive to play a role in helping you and your clients enjoy the maximum benefits of integrating and utilizing our offerings.
We score tremendous joy in watching our partners establish new streams of revenue through the use of Okendo Reviews and Surveys – and we don’t want it to stop. Which is why we believe it’s important for us to provide our partners with regular guidance and support, so they can grow their service offerings using Okendo.
In this guide, we’ll take you step-by-step through the process of building a billable Okendo program at scale. By providing tips for an optimized merchant set-up with the expected hours allotted per step, this guide will help your agency provide strategic guidance and implementation services that set your clients up for long-term success on the Okendo platform, while also empowering your agency to boost your revenue and financial health.
After opening up the Okendo app, the first thing you’ll want to do is to make some basic initial design choices regarding the reviews widget. At this stage, it’s best to keep it simple, limiting your design work to the selection of a font style and color palette using the Auto Style feature:
Click Displays in the sidebar > Choose the Reviews Widget option > Click the Style tab and choose the Auto Style option
Once you have the Auto Style tool pulled up, you’ll select Brand, Primary Text, and Secondary Text colors by clicking the hex code field and using the color picker.
Click Accept and Fill > Click Save Changes
Okendo will automatically generate a unique color palette based on your three sections and apply them to your reviews widget style settings.
At this stage, you won’t be doing any advanced styling, so focus only on selecting colors that align with the merchant’s brand design and aesthetics. If the results aren’t to your liking, or you’d like to make some slight adjustments, the auto-generated colors can be modified at any time.
Need more Global Design support? Click here.
When you’re designing reviews widgets, it’s important to do so in a way that optimizes the display of your highest impact reviews. This means ensuring the most valuable, in-depth, and content-rich feedback is clearly visible to prospective shoppers. This helps brands build trust around their customer’s products and can ultimately lead to higher conversion rates.
Okendo provides 7 different widget display templates to choose from, and each template can be customized using the Style Editor to highlight what’s most important to the brand. Relevant display features include:
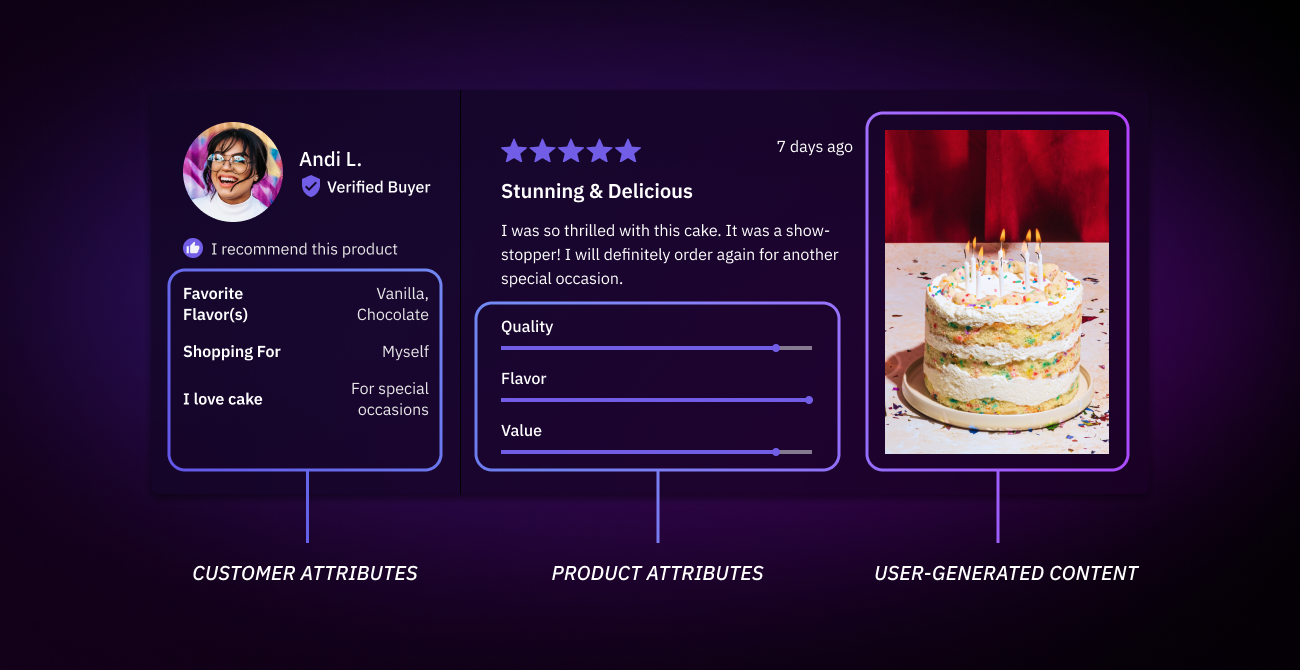
Photo & video. Support user-submitted photo and video content to provide social proof and build trust among new shoppers.
Product attributes. Drive home the main value proposition of your product by asking customers to rate the product’s performance on a range or centered range scale.
Customer attributes. Add a touch of personalization by including unique customer attributes such as age, hair color, or relevant demographic information as part of the review process. This will allow new shoppers to search and access reviews from similar customers, while also allowing you to collect actionable zero-party data that can be used toward personalized marketing campaigns and promotions.
Q&A. Provide fast and straightforward answers to frequently asked questions by adding a Q&A section to your review template, or by installing a standalone Q&A widget to the location of your choice.
In order to determine which widget works best for your client, you’ll first need to consider what such a review looks like in the context of their brand. For example, if your client is in the apparel industry, it may be most important to emphasize user generated content (UGC) highlighting the item’s appearance, as well as customer attributes like demographics and sizing information. On the other hand, if your client is a food or beverage company, it may be better to prioritize the display of product attributes, such as taste, quality, and sweetness factors.
For recommendations on attributes for our most popular verticals, please refer to the articles below:
Need more Widget Design support? Click here.
Now that you’ve designed the reviews widget for your client, the next step is to set up and design the review capture form. This is what customers will interact with when submitting a review, so it’s crucial to design your capture form in a way that allows for, and even incentivizes, high impact reviews.
If you’ve set up global styling in the Okendo app, then the review capture form will already be pre-styled per Okendo’s default. If you decide you’d like to style the form independently, you can always do so using the Auto Styling feature or exploring Enhanced Style Settings.
Collecting Additional Customer Attributes
In addition to the publicly displayed attributes included in the reviews widget, there may be some customer attributes that your merchants want to collect without displaying them directly on their website. For example, information like a reviewer’s birthday can be used to power personalization, but you wouldn’t want to show this to other customers. To collect these attributes, leave them out of the reviews widget and add them to the review capture form instead.
Leveraging Incentives
Incentivizing customers to leave a review is an incredibly effective way to encourage the maximum amount of feedback, and this feature can easily be integrated into the review capture form. Moreover, if you’ve already established an incentive strategy with your client, setting up incentives should only add around 10 extra minutes to the process. If you haven’t already discussed incentives, work with your client to determine what makes the most sense based on their unique goals and financial output. This would add additional billable hours on top of the implementation and design of the review capture form for your consultative services.
For example, you might explore tiered incentives, which reward customers with digital coupons in exchange for higher quality reviews, such as those featuring photo or video content, and can be set up natively through Okendo.
Alternatively, clients may choose to offer loyalty points or store credit, which can be configured seamlessly through an integration with one of Okendo’s loyalty partners, including LoyaltyLion, Eber, Smile.io, or Rise.ai.
Ask for Site Reviews
Scaling your reviews strategy doesn’t just mean collecting product reviews. But they can act as a gateway for brands to engage shoppers in other ways, including encouraging them to provide feedback for other aspects of the ecommerce experience.
For example, after a customer submits a product review, you might ask them to provide a site review, too, on the Post-Review page. Site reviews establish the rating aggregate which can be used for a brand’s Google Seller Ratings.
Using Okendo, you can configure the Post-Review page to include the Site Review module, which asks customers to rate their experience at your store after they submit their reviews. Indeed, we enable all customers to leave both a product review and a site review.
Now that you’ve done some quality design work, it’s time to focus on how your clients send review requests directly to their customers. This is called your Review Request Sequence, an email and/or SMS based process that can be configured based on your unique review generation strategy, as well as the individual preferences of customers.
Email Review Requests
Email review requests can either be sent using Okendo’s native email feature, or through an integration with one of our partner providers, and the right option will depend largely on your merchant’s existing tech stack. Okendo’s native email tool comes with a variety of easy-to-design templates, and can be customized to reflect the brand’s style and tone using the Style Settings feature.
For brands utilizing one of our partner providers (Klaviyo, Attentive, Omnisend), taking advantage of the integration is an alternative option. Using an integrated partner allows agencies to create review request messages that are consistent, on-brand communications. Based on the complexity of the brand’s email designs, you can bill them at a similar hourly rate as you have for the rest of their email program to set up the Okendo review request sequence.
SMS Review Requests
Some customers may prefer to be reached through SMS or mobile communications, and while the Okendo platform does not currently have its own native feature for mobile outreach, we offer integrations with all of the above listed providers, in addition to Postscript, an SMS-only platform.
To learn more about how to integrate Okendo with one of our supported ESP or SMS providers, visit the following links:
Okendo X Attentive Integration
Okendo X Postscript Integration
Best Practices
Whether you leverage SMS or email to issue review requests, here are some best practices to help you maximize engagement:
Send review requests based on the customer’s preferred channel
If your client is using a combined ESP/SMS platform such as Klaviyo, you have the ability to split the delivery channel in the review request sequence. For example, if a customer is opted in to receive SMS messages from the brand, the review request may be better suited to be delivered via SMS. However, customers who have not opted in can still receive their review request via email.
Send review requests based on delivery date
With Okendo, you can send a review request a certain number of days after an order has been delivered to ensure customers have received their products before being asked to leave a review. All you need to do is configure the wait time to “after delivery” on the sequences page. To ensure the delivery date of the order is being used you must be tracking your packages through Shopify or Okendo’s AfterShip integration.
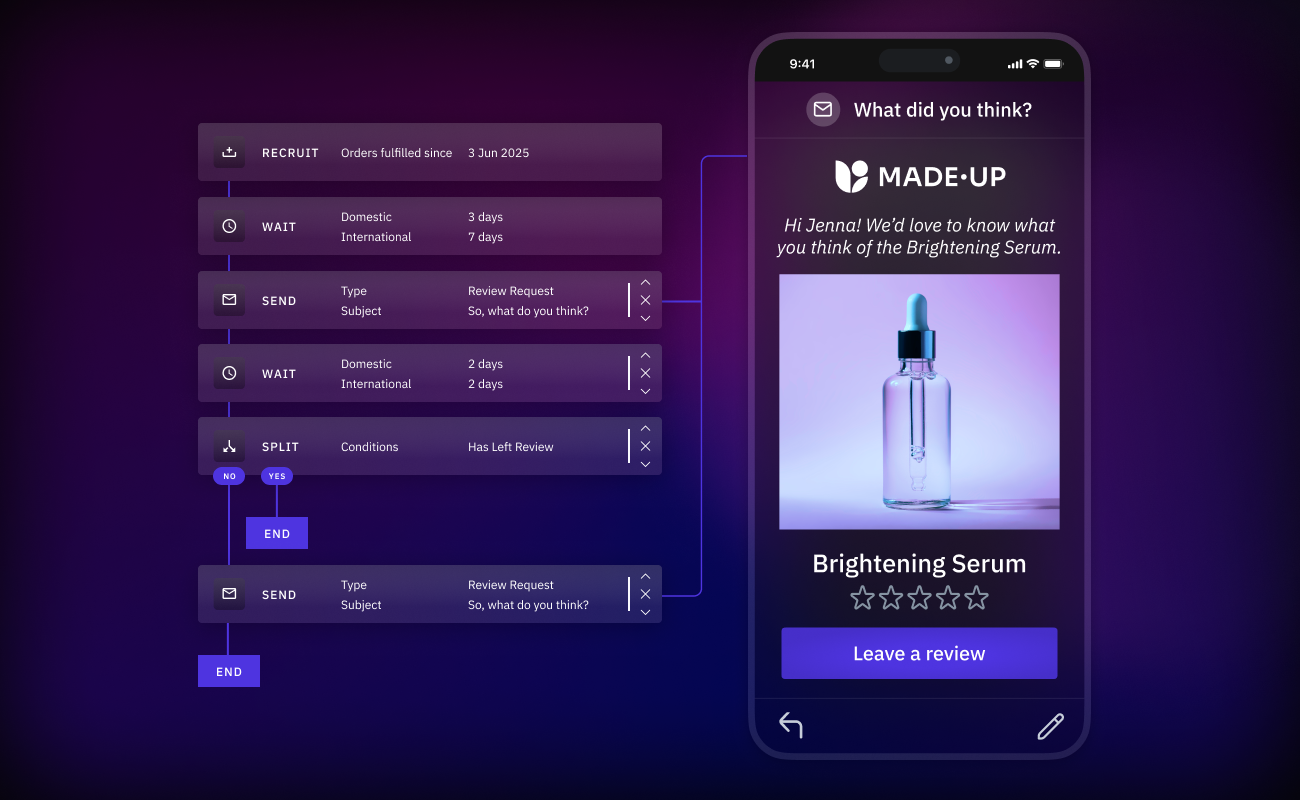
Set up review requests with reminders
You can also create a sequence to remind customers via email to leave a review. In general, you want your reminder email to feel the same as the initial review request email, but a good idea is to tailor it to context with a different subject line and body text.
Review requests with reminders for media
Similar to the above, you can also send your client’s customers a reminder to add media to strengthen their review. Here, you would leverage the “Review Request With Photo Reminder” sequence template which allows you to customize two initial “review request” emails and then an “add media” email type.
Clearly communicate incentives for review completion
It’s not enough to just offer shoppers an incentive for leaving a review. It’s imperative that you efficiently communicate the existence – and lure – of these incentives to maximize review responses. Make sure this information is clearly visible when prompting customers to leave a review via email or SMS.
Pro tip: The most important action here is for your customer to complete their review. Remove any ancillary CTAs, like Shop now or even social handles so there are no distractions.
For additional review generation support and best practices, visit our article on post-delivery review requests as well as our extended email usage guide.
While reviews will be styled based on the global design default settings, it’s important to implement them across your merchant’s website in a way that maximizes their overall impact on conversion and AOV. When deciding which widgets to include and how to utilize them, consider the following strategies along with your client’s unique needs and expectations:
Add media grids or carousels to increase the visibility of high impact reviews. Photos, videos and other UGC are invaluable assets when it comes to building trust and maximizing the impact of reviews. Consider bringing UGC to the forefront by adding an interactive media grid or media carousel to accompany reviews displayed across the site.
Set up a dedicated reviews page to optimize search results. Customers should have a convenient place to browse reviews on your merchant’s website, so be sure to set up a dedicated reviews page that’s easy for any new customer to find when searching, “[brand name] reviews”. Additionally, consider incorporating a text search feature that allows customers to locate specific reviews and product categories efficiently.
Group multiple reviews on a single product page. Grouping reviews from multiple products together is another great tactic for building confidence among consumers. This can be particularly helpful for brands offering bundled or variety-pack products, as well as bringing credibility to a product that may be new or have less reviews than similar items.
For more ideas on how to maximize review displays across your merchant’s website, check out this article on increasing conversion rates.
In addition to optimizing reviews displays throughout the website, it’s critical to maximize the impact of reviews across your client’s marketing strategy wherever possible. This means optimizing everything from their email and SMS strategy, to how their reviews and product advertisements appear on search engines and social media platforms. By implementing a reviews strategy outside of the Okendo platform, your agency has the opportunity to provide more strategic value to your merchants and boost their ROI for Okendo beyond the product detail page.
Here are a few Okendo features and best practices to consider. Each recommendation is a unique implementation that represents more potential billable hours for your brand.
Syndicate reviews to Meta. Syndicating reviews, particularly those containing UGC, is an effective way to spread social proof and get more eyes on your merchant’s products. Consider tapping into Okendo’s Meta integration to bring review visibility to Instagram and Facebook Shops.
Add star ratings to Google Shopping ads and Google Seller Ratings.
Adding reviews and star ratings to product advertisements can have a positive impact on your overall ad performance. We’ve made this easy to do with our integrations with Google Shopping and Google Seller Ratings.
Add star ratings to abandoned cart and upsell/cross-sell emails. Social proof is an important conversion driver at critical stages of the buyer journey including abandoned carts & upsell/cross-sell opportunities. Dynamically pull in aggregate ratings or review blocks to make a stronger impact on conversion for these critical touchpoints.
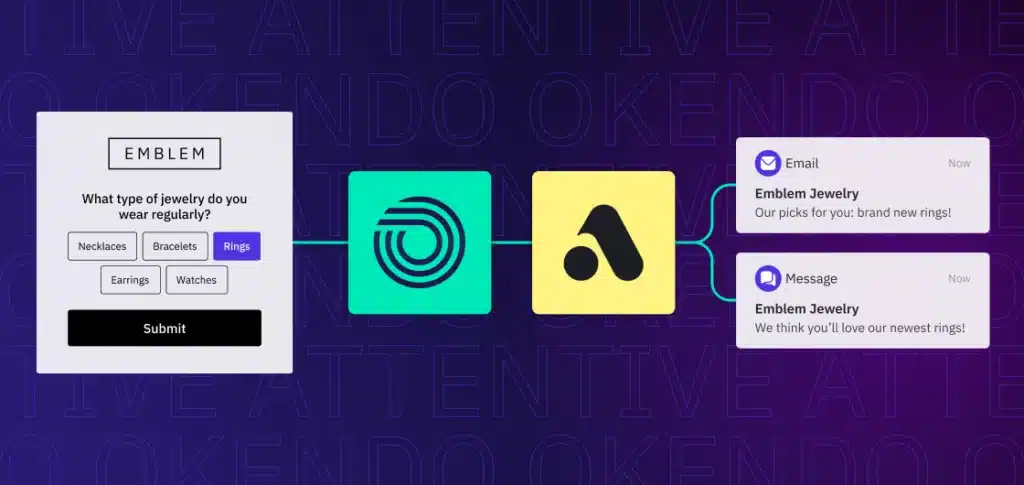
Leverage zero-party customer data from attributes in personalized communications. As mentioned previously, the customer attributes collected through product reviews can be used to segment customers based on shared characteristics, behaviors or preferences, and ultimately to power personalization. Fortunately, it’s now easier than ever to introduce Okendo data into your segmentation strategy using the Klaviyo and Attentive integrations.
Check out this example of how Slate Milk used the data from Okendo’s customer attributes to send targeted emails for driving repeat purchases.
Ask 5-star reviewers to refer a friend. Send customer referral requests via email or SMS to satisfied buyers who leave 4 or 5 star reviews. By asking satisfied customers to refer a friend, brands can capitalize on positive word-of-mouth to drive income by turning happy customers into brand advocates.
Give your customer service teams access to customer reviews. Okendo allows you to take a number of unique approaches to harmonizing email and customer service communications, including streamlining review moderation and customer service through our Gorgias integration. By giving customer service teams insight into customer review data, they can proactively respond to negative reviews and resolve any issues that arise with previously satisfied customers.
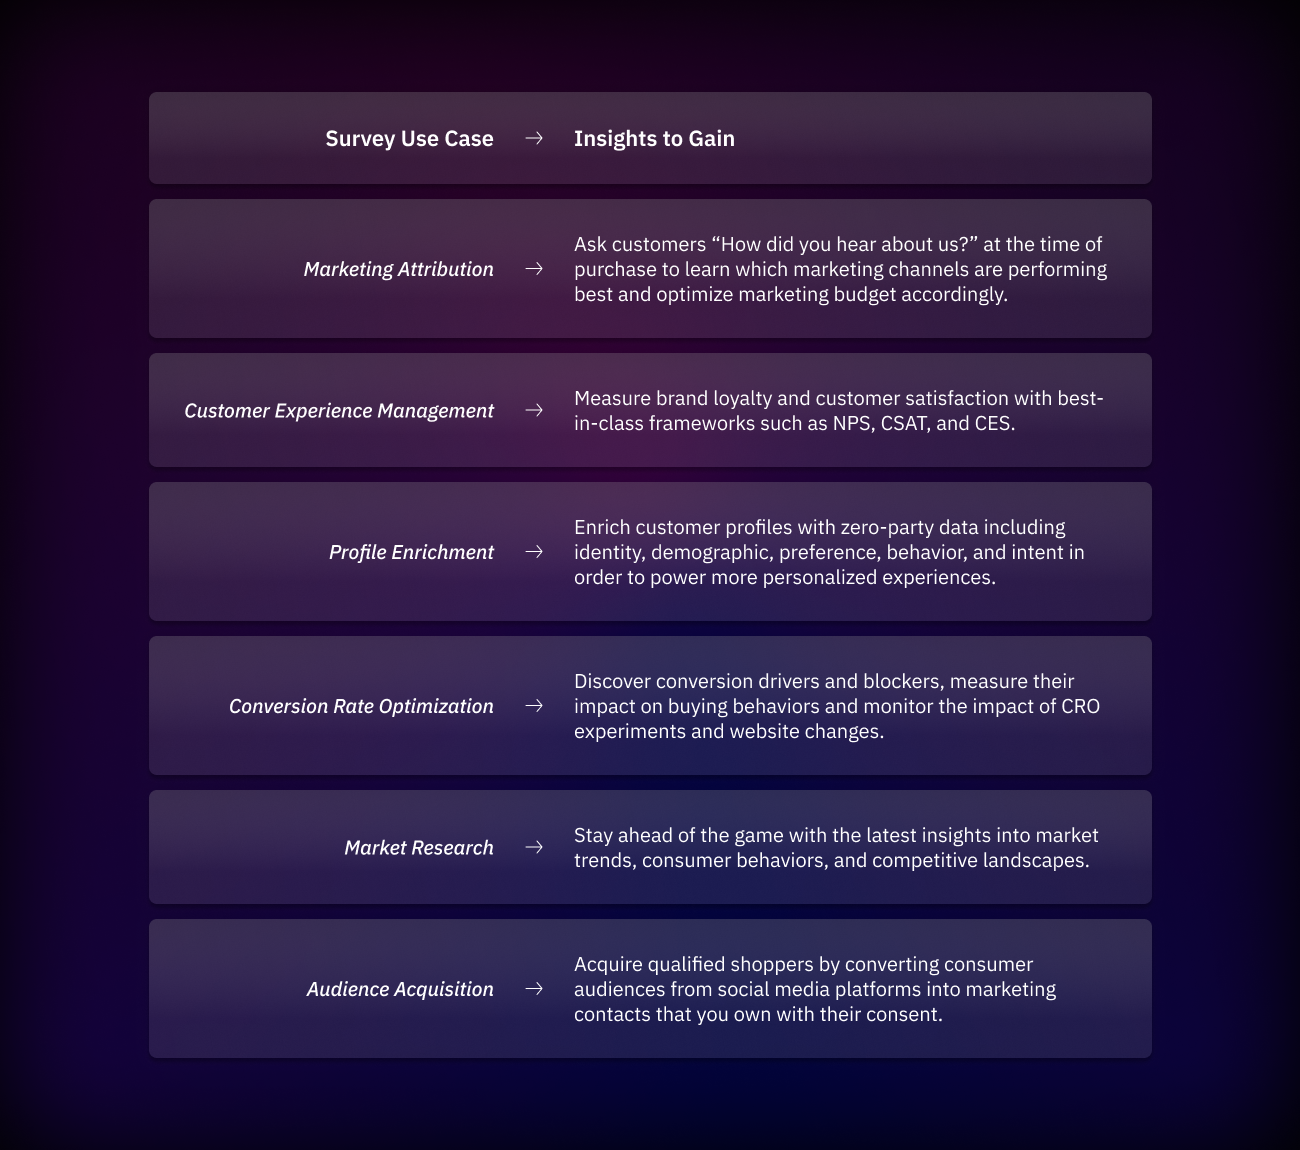
Before you can get your clients started on Okendo Surveys, you’ll need to identify what kind of information they’d like to discover.
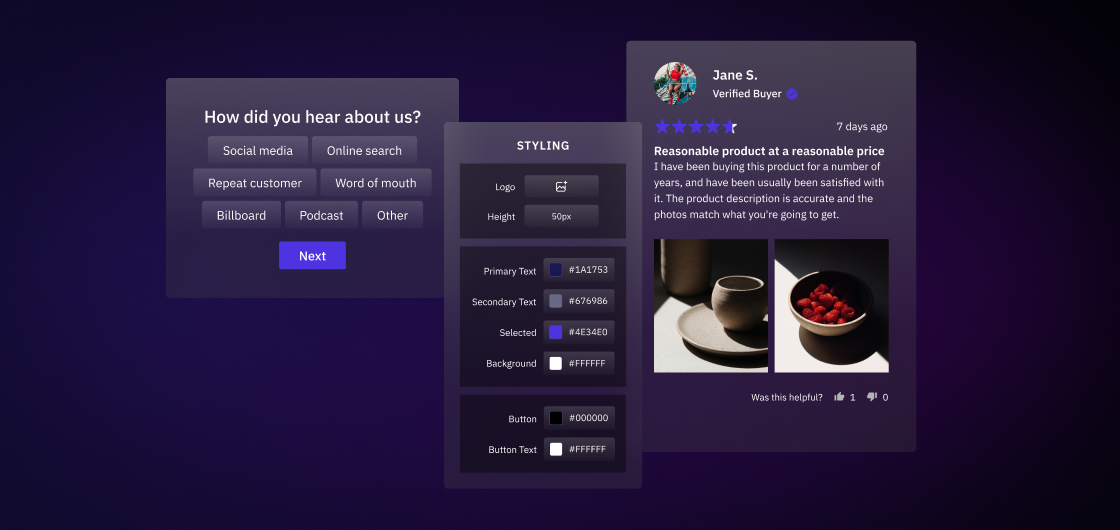
Surveys questions come in various types and have various use cases, so which surveys your client uses will depend on their unique objectives. However, one of the benefits of Okendo Surveys is the ability to collect continuous insights with multiple surveys running at the same time. At a minimum, DTC brands should always be collecting customer insights around marketing attribution and NPS. Okendo supports multiple survey use cases should a brand want to collect any additional insights.
Now that you’ve zeroed-in on exactly what your client wants to learn, it’s time to start building out surveys.
It only takes two easy steps to create an Okendo survey:
Choose a template and create your survey
Okendo Surveys accelerates survey creation by providing a number of ready-to-use and customizable templates, while also providing the option to clone an existing survey or simply build one from scratch.
To choose a template, click Surveys on the sidebar in the Okendo app, choose +Create New on the Survey List page, and select an option such as “Blank Template,” “Net Promoter Score (NPS),” or “Attribution Survey,” among others.
From here, you can begin creating your survey by selecting from a range of question types and entering your questions into the template.
Add conditions to your survey questions
While it’s possible the survey you’ve created is ready to be delivered to customers, there may be instances where you’d like to add conditions to individual questions in order to learn more about the customer’s response. For example, if a customer provides a low NPS score, you can ask them a second conditional question to gain additional insights into the customer’s problem.
To add conditions to survey questions, your survey must have at least two questions. Click the Add Condition button, and begin defining conditions to maximize the generation of customer insights.
Pro-tip: Okendo recommends asking 3-5 survey questions in order to maximize survey responses without risking an interruption to the user experience.
Enable Contextual Targeting
With Okendo’s contextual targeting feature, your clients can determine rules on when and how surveys are delivered to certain customers. More specifically, this feature ensures that surveys are sent in reaction to real data, whether it’s the preferences of a customer segment, or the actions of a customer in real-time.
This not only improves engagement rates, but it also removes the frustration of sending duplicate surveys to the same customer, or delivering surveys that simply aren’t relevant to a customer’s experience. This is especially important if your clients are running multiple surveys on the same channels at the same time.
After you configure a survey, you’re ready to decide on how you’re going to get the surveys out to customers.
With Okendo Surveys, you can easily distribute them using the following four channels:
Post-checkout. Utilizing surveys post-checkout is an effective way to capture customers at a high-point of engagement to learn where they came from, reveal bottlenecks in the buying process, and more.
On-site. Prompt shoppers with quick, in-the-moment microsurveys directly on your client’s website to gain real-time insights into the customer experience.
Sharable link. By converting a survey into a shareable link, it becomes easy to distribute efficiently across multiple platforms, including email, SMS, and social media networks.
Post-review. Whether customers liked or disliked the product or experience, presenting them with a survey immediately after they complete a review allows them to expand on their feedback, giving you additional insights into the factors that informed the review.
Offer incentives for survey completion
Additionally, similar to Okendo Reviews, your clients may choose to offer an incentive to increase survey completion rates. Okendo Surveys allows brands to set up a Shopify coupon code for a dollar or percentage amount off the customer’s next purchase, configured at the survey level.
When adding a survey to the distribution channel in the Okendo app, you will be prompted to configure the chosen incentive, if any. The unique coupon code will be added to the outro page at the end of the survey and will also be emailed to the customer.
Data generated from Okendo Surveys can be used to create targeted audience segments in Klaviyo and Attentive. While the sync may take 1 hour per survey, each email design can add up to an additional 3 additional hours per email.
Here are some best practices for utilizing different survey data to build smarter campaigns.
Leverage zero-party customer responses to power personalization.
Similar to the insights collected with customer attributes, any zero-party data collected through survey responses can be used to segment customers or create 1:1 personalized email or SMS communications.
Ask NPS promoters to refer a friend.
Set up an email or SMS communication asking anyone who answers 9 or 10 on an NPS survey to refer their friends to your client’s brand.
Successful referral programs require enticing rewards that benefit both the referrer and the recipient. As your first step, you need to decide how much to reward a Referrer for sharing your client’s brand and a Recipient for making their first purchase. You can choose to offer different rewards to each.
To edit the rewards, click on the Rewards tab. This section allows you to configure:
It’s important to ensure clarity by specifying benefits and implementing a reasonable expiration date, such as 30 days. This provides ample time and motivation for purchases within the given timeframe.
You can also set how long it will take before the Referrer gets their reward after a Recipient successfully places an order by clicking on the “Delay Referral Sender Reward Days” setting.
The “Recipient Offer Validity” setting lets you decide how long a coupon will be honored for. This is helpful in case the referral program is amended after a Recipient has received their coupon link.
Consistency in customer experience is key, and Okendo allows you to harmonize the look and feel of referral prompts with your client’s website.
Navigate to the “Forms” and “Styling” tabs to seamlessly customize the appearance of your client’s referral prompts, aligning them with the distinct style of their brand. Here, you can easily modify fonts, colors, and texts to suit your client’s brand.
Maximize the impact of your referral campaigns by incorporating them into email outreach.
Okendo simplifies this process by providing pre-built templates, but it’s a good idea to customize them further to match the look and feel of your client’s brand.
To tailor your emails, head to Mail > Mail Templates > Referral to find all the relevant emails.
You can edit the color makeup and copy of each email in the referral user journey.
The next step is to enable the Referral prompts at various customer touchpoints. You have two options when doing this:
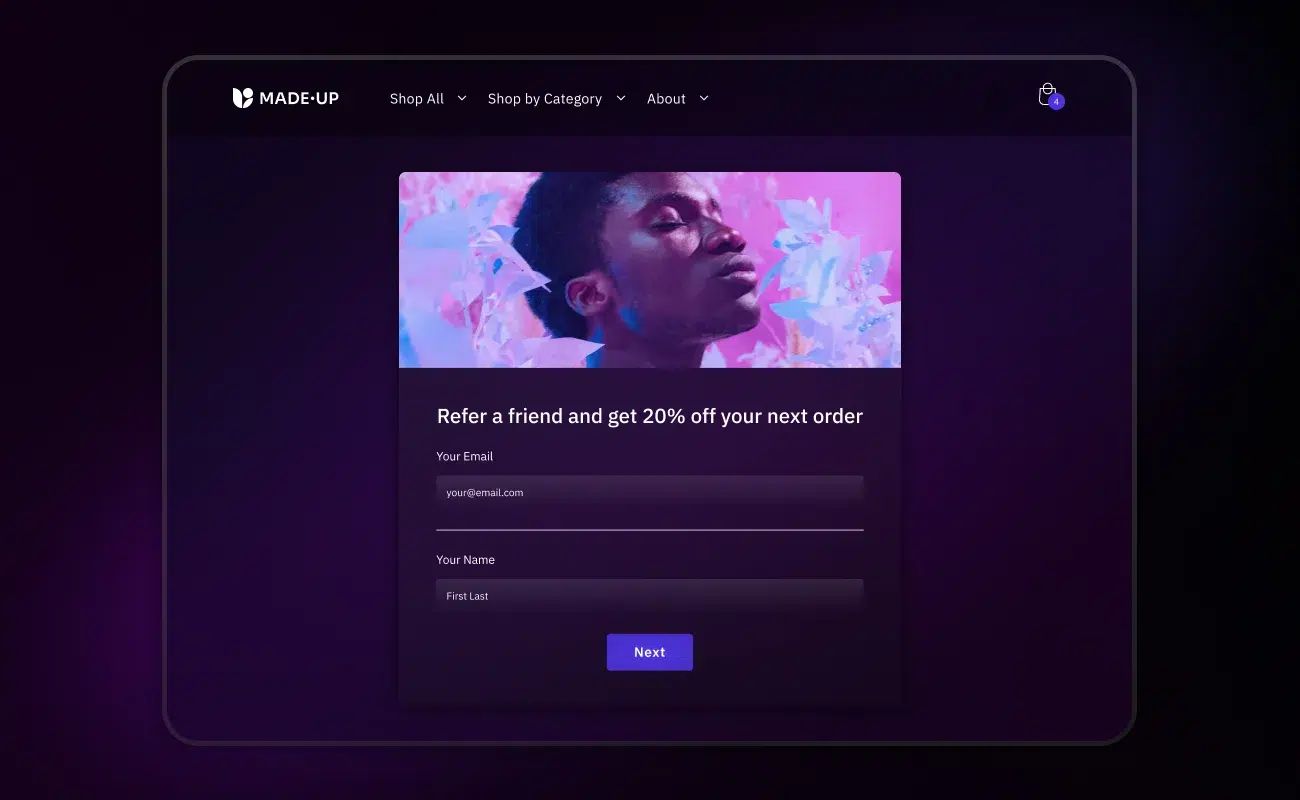
Option 1: Create a Landing Page
Utilize Okendo Referrals to seamlessly integrate the referral program into the header and footer of your client’s website. Placing it in the header ensures high visibility, while the footer maintains a consistent presence.
To create a landing page:
Note: If your website is headless, please refer to this help article.
The Referral landing page URL can be easily purposed into marketing campaigns and flows to encourage customers to make referrals at various points in their journey.
Option 2: Embed in the Review Capture Form
Capture the momentum immediately after a customer leaves a positive review by prompting them with a referral request. Their positive review makes them ideal for referring a friend or family member.
Position the prompt at the top of the review page for maximum engagement. Okendo recommends triggering the module specifically for 4 or 5-star reviewers, leveraging their positive sentiment for effective referrals.
Elevate your Okendo Referrals strategy by integrating it into an evergreen content block. This block, present in all campaigns, should feature engaging copy, visuals, and a clear call-to-action (CTA) directing users to the referral sign-up page. This approach ensures continuous visibility and promotion of your client’s referral program.
To set up an evergreen content block:
Design. Create a visually appealing and informative content block that highlights and promotes your client’s referral program. This block should include compelling copy, visuals (e.g., images or graphics), and a clear call-to-action (CTA) button that directs users to the referral program’s sign-up page.
Consider creating a block with different messaging for those who have already signed up for your program vs. those who have not.
Customization and Personalization. Make the content block hyper-personalized by including dynamic content tags that can be customized based on user information, such as their name or recently purchased products.
Conditional Display. We encourage the use of conditional logic to display different messages to users who have already signed up for your referral program compared to those who haven’t. To do this, within your email template follow the below steps:
person|lookup:’Okendo Referral Shareable Link’
Tracking and Analytics. Implement tracking mechanisms to monitor the performance of the referral promotion content block. You’ll want to know how many recipients are clicking on the referral CTA, how many referrals are generated, and the overall impact on your email campaign’s success.
Before you can start building a quiz with Okendo Quizzes, you’ll need to understand what information your clients want to find out about customers and what products they want to recommend.
Once you’ve identified your client’s goals for their quiz campaign, you can start constructing your personalized quiz. Complete customization is key to capturing customers’ unique needs. Learn how to construct a personalized product recommendation quiz that aligns with your client’s goals.
Follow these steps to create a quiz:
To start adding questions, click on the + button within the Questions section of the Build tab. You will have a choice of five different question types.
Single-Select. Participants can select only one answer for a single question.
Multi-Select. Participants can select multiple answers to a single question.
Content Page. Create a separator between questions if you intend to ask your participant different sets of questions. This question type works for longer quizzes so you can break it up into categories and sections.
Five-Point. Participants can assign a numerical value to rate their experience.
Rating. Participants can select between one and five stars to rate their experience.
After you’ve chosen a question type, add answer options by clicking +Add Option. For Single-Select & Multi-Select question types, you can add images to each answer option by clicking on the icon to the left and uploading a custom image.
Settings available for Single-Select & Multi-Select questions include:
Question Branching
You can branch your quiz questions based on customer responses, directing them to different follow-up questions. For instance, if a customer indicates “Oily Skin” to the question “What is your skin type,” route them to a question about the specific oily areas. Conversely, if they choose “Dry Skin,” prompt them to questions about the driest areas.
Ensure a minimum of two questions is created before introducing conditions: the initial question for conditionalizing and a subsequent question. The “Add Condition” button becomes accessible only after generating the subsequent question. Note that you can apply multiple conditions to a single question.
To implement branching, click the three-dot menu at the top right of a question, and select “Add Branching.” Specify the question to be skipped to based on your conditions.
Further conditions can be added by clicking the 3 dots next to a condition and selecting Add condition below. Thereafter you can specify what an answer should be equal to in order to progress to a specific question or straight to the recommendations.
Configure your product recommendations to display specific products aligned with customers’ answers. This makes it easy for shoppers to add product recommendations to their cart with just the click of a button, a feature that can significantly boost conversions and drive sales.

To configure product recommendations, follow these steps:
Conditional Logic
Conditional Logic allows you to take a combination of answers from a quiz taker and show a recommendation based on that information. It can be applied to show specific products based on the answers customers provide during a quiz. This way, the recommendations are personalized and directly relevant to the user’s preferences or needs.
Inclusion conditions should be applied to determine which recommendation is shown, depending on which answers are given.
Exclusion conditions can be applied within each recommendation to exclude certain products depending on which answers are given. It can be configured by clicking on the 3 dots next to a product and selecting Add Exclusion Condition. For example, if a visitor answers that they’re allergic to a particular ingredient, the recommendation could exclude any products that contain that allergen.
A fallback recommendation will be shown when a visitor’s answer combinations are not satisfied by the conditions set for other recommendation pages. To configure the fallback recommendation, select the pen icon, input the title (for example, “Here’s a gift card!”) and select the fallback products. A fallback recommendation does not allow conditions to be specified and will be shown if no other recommendation matches.
For more information about how to configure product recommendations, read this guide.
Okendo Quizzes simplifies the styling process with an easy-to-use editor, allowing you to seamlessly align the quiz with your client’s brand look and feel for a consistent and appealing user experience.
To style your quiz:
Apply styling settings across a quiz
Navigate to Quizzes > Quiz List, click on the 3 dots next to an existing quiz and then Edit. If you are creating a new quiz, click + New Quiz at the top of the page.
Click on the Configure tab. You will be able to edit General styling settings for the quiz, the Intro Page, Questions and the Recommendations Page.
Each of the sections allows you to customize specific parts of the quiz and its elements.
Preview style settings
Styling changes can be previewed using the window next to the styling form. To reach a specific section of the quiz, navigate by answering the questions in the preview.
To reset the preview back to the Intro Page, click the X button in the top right of the window. The preview can be shrunk or expanded using the toggle in the top right of the styling form to view how the quiz will scale depending on the area available.
Pro Tip: You can instantly jump to a preview of the recommendations page by switching to the Test tab and switching back to the Configure tab.
Apply styling settings to individual questions
Single-select and Multi-select questions have additional styling settings that can be applied to support images. Navigate to the Build tab and edit or create a Single-Select or Multi-Select question.
Pro Tip: Images are recommended to be uploaded in the same ratio for each question option. Square (1:1) images are recommended for Side By Side, Tags and Circles layouts while either 1:1 or landscape images work best for the Stacked layout.
Implement custom CSS
For further quiz styling adjustments that cannot currently be made within the admin, custom CSS can be used. Example usage of custom CSS to adjust styling include:
To add the custom CSS, locate the appropriate selector in your browser and make the required modifications.
Copy the CSS into the Okendo admin:
Ensure the seamless functionality of your client’s quiz with Okendo Quizzes by conducting thorough testing within the platform before making it live. This step is crucial to guarantee the quiz works flawlessly before customers interact with it.
Test questions, answers and recommendations
Identify changes required and publish the quiz
Having tried various answers to the quiz, you may identify issues with the set up such as:
Switch back to the Build tab and make the required changes to the recommendation conditions. Follow the testing steps again to ensure the recommendations display correctly.
Publish the quiz on-site once you are satisfied with the test results.
Once confident in the quiz’s functionality after testing in the platform, seamlessly integrate it into your client’s store with the following steps:
To install your quiz as a widget:
Navigate to Quizzes > Quiz List, click the 3 dots next to an existing quiz, and then Install.
Follow the instructions to install the embedded quiz using either of the two methods.
Method 1: Add a Quiz within a Page Section (For Shopify 2.0)
Click on the copy button next to the Quiz ID field.
Go to the Shopify backend, click on Online Store > Theme > Customize.
Navigate to Pages from the top menu and choose which page template to edit.
Make sure the Okendo app embed is switched on.
Click on Apps > Add Block and select Okendo’s Quiz Widget.
Insert the Quiz ID that was copied earlier from the Okendo app.
Method 2: Embed Quiz Snippet in Theme
Click on the copy button next to the Embed Snippet field.
Follow the steps in Method 1 to edit a Theme but add a Custom Liquid section to a page.
Go to the Shopify backend, click on Online Store > Theme > Customize.
Choose which page template to edit.
Click Add section and select Custom Liquid.
Insert the copied code from Okendo into the Custom Liquid section.
The quiz will now be displayed in the Theme Customizer. Click Save to finalize changes.
For a detailed guide on installing your quiz, click here.
Enhance engagement and incentivize participants by incorporating rewards into your Okendo Quizzes. Rewarding users for their participation can significantly boost interest and drive positive outcomes.
Configuring Quiz Rewards:
Click Edit Quiz > Configure > Rewards.
Select A Coupon for reward quiz completion.
In the Discount field, specify the amount and choose between percentage (%) or dollar amount ($) off their next purchase.
In the Minimum purchase field, specify the minimum purchase amount, if any, that your customers must meet to use the discount.
In the Expires after field, select the number of days that your customer has to use the discount before it expires.
(Optional) In the Applies to Collection field, select a collection where the customer can use their discount. If no collection is selected, your customer can use the discount for any product.
In the Description box, enter the text that participants will see once they complete the quiz and earn their reward.
Upon completion of the quiz, the customer will see their results and coupon code.
Customizing Your Quiz Coupon Reward Email
Go to Mail > Mail Templates > Quiz Coupon Reward from the sidebar.
Select the existing email or create a new one by clicking the + New Email button.
Modify a color in the Style section by using the Hex color picker or enter a new Hex code in the field provided.
Pro Tip: If you want to make this email unique from the rest of your customer-facing messages, toggle on the Global Styling switch to override the current global style settings.
Click the Header section to add your company logo or another on-brand image.
Note: You need to toggle on Global Styling to change the current image.
Click the Body section to personalize these areas:
Replace the default Body Content with your own custom message.
Click the Footer tab to add a footer (optional).
Click Save Changes.
Before you start designing a loyalty program with Okendo Loyalty, the first step is to ensure your client is ready to implement a program into their customer marketing strategy. This starts by knowing if your client is comfortable with the cost of rewards that are given in a loyalty program, and if the client wants the program to be sustainable and last long-term.
When you know your client is ready to create a loyalty program, you can start deciding on loyalty earning and redemption rules.
Here are the earning rules offered by Okendo and how to get started:
Other earn rules include:
One option to configure your earning rules is as a fixed-value coupon, providing your client with certainty about the real value of discounts given. For example, clients can give a $10 discount coupon in exchange for 100 points.
Another option for redemption is to give a percentage coupon. For example, you can give your client’s customers 10% off when they redeem 100 points.
Other redemption rules are giving loyalty members the option coupons of variable value, free shipping, and free product.
To configure the general settings, start by naming the client’s loyalty program. This can be a unique name that speaks to your customers and aligns with your client’s brand. The next step is to name the reward currency. Most merchants use “points,” but Okendo’s advice is to get creative with a name that resonates with your client’s customers, just like the program’s name.
The next configurable general setting is to decide when your client’s customers’ points will expire. There are two options:
Other configurable settings include order spend. You can determine how order spend will be calculated for rewards, so you can decide to include subtotal, taxes, or shipping or keep them out of the total order spent for rewards. For your client, think about the parts of the order’s total cost that contribute to points and also contribute to VIP tier eligibility.
Backdating the loyalty program allows you to include prior customer purchases, before program launch, to contribute to a customer’s points balance and VIP-tier spend. This increases engagement among loyalty program customers because they’ll already have points from day 1 of the launch of your client’s program.
Program Start Date
Decide the program start date to determine how far back purchases contribute to points and VIP tiers.
The loyalty page fully displays and explains your client’s loyalty program.
First, create the page on your Shopify storefront. Go to Shopify Admin → Online Store → Pages → Add Page.
Go to Shopify Admin > Sales Channels > Online Store. Select Customize against your store theme.
Select the appropriate template at the top of the page. Then go to the appropriate section in the template and select Add Block > Apps > Loyalty Page. The Loyalty Page elements should now appear on the page. You can move the Loyalty Page app block to its desired location on the page.
When you have finished customizing, save the template and exit.
To configure the loyalty landing page, navigate to Okendo Admin > Loyalty > On-site Displays > Loyalty Page. Note the configurable elements of the page on the left and the preview pane on the right. Review changes to the Loyalty Page, in real time, via the preview pane.
Configure style elements of the landing page, including button colors, button borders, text and link colors.
Easy Quick-Start Styling
For an easier way to simplify the process of styling the Loyalty Page, select Quick Start > Auto Style. Auto Style can create an entire color palette, based on the selections below and applies them across different elements of the Loyalty page:
The floating widget gives customers easy access to their loyalty program information across all pages of your website to personalize the customer experience.
Configure the Floating Widget
To access the Floating Widget, navigate to Loyalty > On-Site Displays > Floating Widget. Take note of the customizable elements on the left and the live preview on the right. Monitor modifications to the Floating Widget instantly through the preview panel.
Use Preview Settings to test how the Floating Widget will look and feel for your client’s customers who are logged in, and are of a certain tier group or have a particular points balance. Access the Preview Settings by selecting the settings icon.
Quickstart
Okendo gives you the option to simplify the process of styling the Floating Widget by selecting Quick Start > Auto Style. Auto Style can create an entire color palette, based on the selections below and applies them across different elements of the Floating Widget:
VIP Tiers can be launched at the same time as the loyalty program or after the program has launched.
Creating a loyalty program with VIP Tiers drives more engagement and further loyalty to your brand by giving customers an incentive to spend more with your client and move up tier levels.
To create VIP Tiers, go to Loyalty → Configure → Points Rules → VIP Tiers.
How to create a new tier:
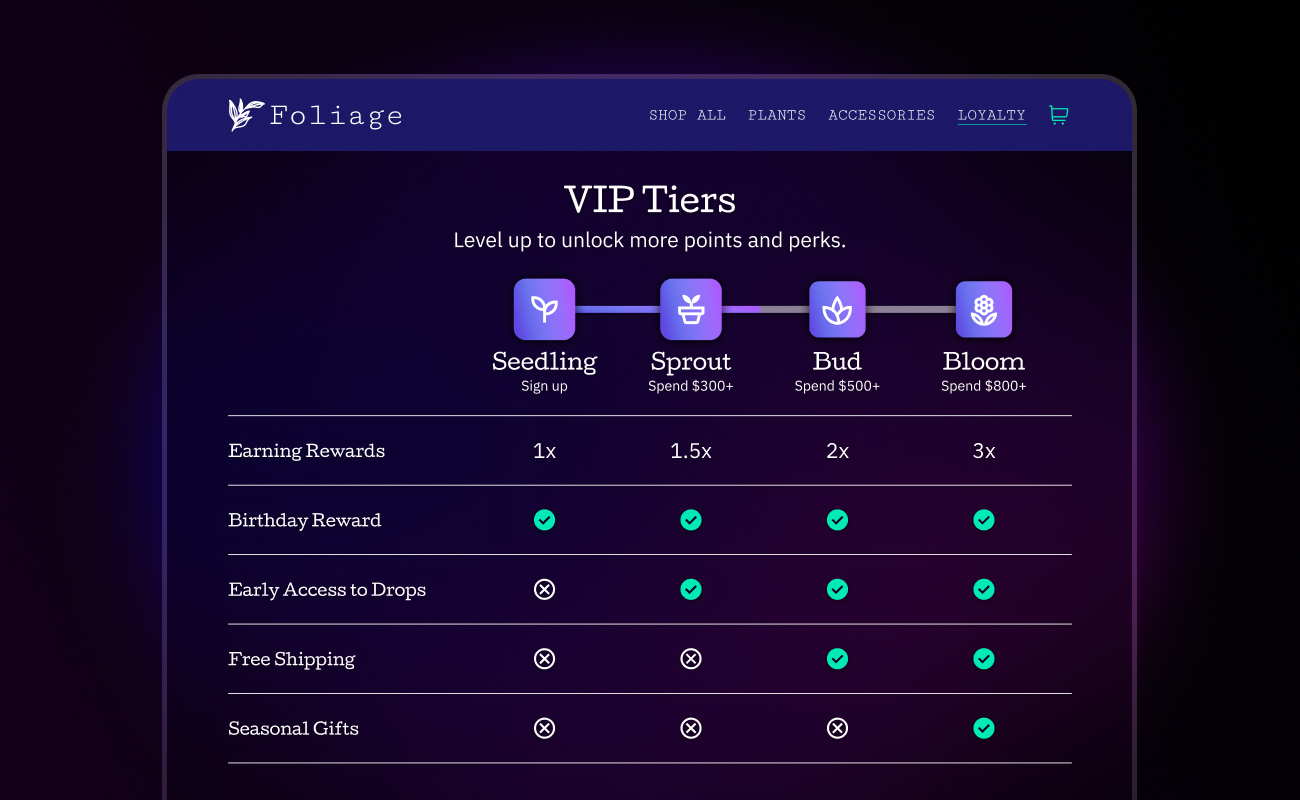
You can modify or delete existing VIP Tiers, provided VIP Tiers as long as the tiers have not been launched. If you need to modify or delete VIP Tiers after they have launched, contact Okendo Support.
To modify an existing tier:
Go to Loyalty > Configure > Points Rules > VIP Tiers and select the tier in question. Modify details as required.
To delete an existing tier:
Go to Loyalty > Configure > Points Rules > VIP Tiers and select the tier in question. Select the Delete button at the bottom of the tier.
When VIP Tiers are created, rule variations can be added to make each tier a hierarchy to motivate customers to move up tiers:
To add rule variations:
While setting up the loyalty program is the first step, how you promote your client’s program can maximize its success, especially when it comes to sending loyalty SMS and email campaigns. This includes communicating with your current loyalty members, as well as promoting the program to motivate new members to sign up. You can utilize Okendo Loyalty emails in addition to the Okendo-Klaviyo and Okendo-Attentive integrations when promoting your program.
To begin customizing your emails for Loyalty in Okendo, follow these steps:
You can customize the following templates in Okendo:
Styling emails:
After selecting the email, use the styling controls to customize the look of various elements within the email to match the look of your brand. Toggle on Override Global Styling to control style options used on this email only or toggle off to inherit Global Styling (located under Settings > Mail > Styling).
Header:
To add a header image, navigate to the Header section and enable Override Global Settings. Click or drag to upload your image. After uploading, adjust the image width for the correct size. If you want to select a different image, deselect the current one and upload a new image.
Note: If you plan on using the same image in the header for most of your emails, it’s better to set the image up as a global default in your Email Styling Settings.
Learn how to personalize the body of the email as well as the footer, and how to set configurable options here.
Loyalty Data Sent to Klaviyo
Here is the event data you can use to trigger flows in Klaviyo:
How You Can Use This Data for Email Communications in Klaviyo
To connect Okendo Loyalty to Attentive, follow the instructions here.
The profile and event data sent are the same for Attentive as for Klaviyo. To see all profile and event data types, as well as the email communications enabled using this data, please refer to the Klaviyo section above.
For more information on how to access profile and event data for SMS with Attentive, and how to create event and profile data in segments, see the details here.
Conclusion
As demand for high-quality ecommerce experiences heats up, skilled agency partners are critical to help merchants grow their online businesses. We built this guide to not only assist our partners in transforming how their clients engage with shoppers online, but to bring new revenue-generating opportunities to the table for our partners, too.
Indeed, we’re proud to work with our partners to help maximize the use of Okendo Reviews and Surveys as part of their billable programs. If you’re looking to onboard new clients to Okendo to produce more revenue, check out our recent blogs that dive into what to look for in a customer reviews and surveys provider.
Have additional questions about any of the above strategies, or simply want to learn more about how to set your customers up for success on the Okendo platform? Feel free to reach out to your Partner Manager, or email partners@okendo.io and we’ll be happy to help.
Related articles
Ready to learn more?